Deadlifts aren’t dangerous! Not more than any other exercise or sport you can play. Deadlifts have a lot of benefits IF DONE CORRECTLY! Easier said than done, as improper form can lead to back pain and injuries
This blog guides proper techniques and tips to avoid back pain. I will also show you through an assessment to identify what position hurts/triggers your back!
Whether you are a beginner or an experienced lifter, you’ll find valuable information in this blog to help you achieve safe and effective deadlifting. Incorporate these techniques and tips to build strength, identify your back pain, and deadlift confidently.
Let’s get started!
What is a deadlift?
Deadlift is a hip-dominant strength exercise that works the posterior chain (hamstrings, the gluteus, erector spinae muscle group, trapezius, rear deltoids, and calves). These muscles are responsible for explosive movements like sprints and jump. They also prevent you from injuries and help with your posture!
The deadlift is also known as the king of exercises. It made it to the heaviest lifts in the world in powerlifting, and the numbers are just growing! It is also an excellent exercise for building strength and muscle mass.
Therefore I highly recommend including this exercise in your routine. However, if you experience back pain, modifying the exercise instead of completely avoiding it can be helpful.
There are various alternatives to the conventional deadlift that you can try and perform without any pain, such as:
- Single-leg deadlift
- Trap bar deadlift
- Romanian Deadlift
- Sumo Deadlift
- Goblet Squat
- Thrusters
How to perform it correctly?
Now that you’re know what deadlifting is, let’s break down the exercise into the following phases:
- Start position
- Lifting phase (concentric)
- Top Position
- Lowering phase (eccentric)
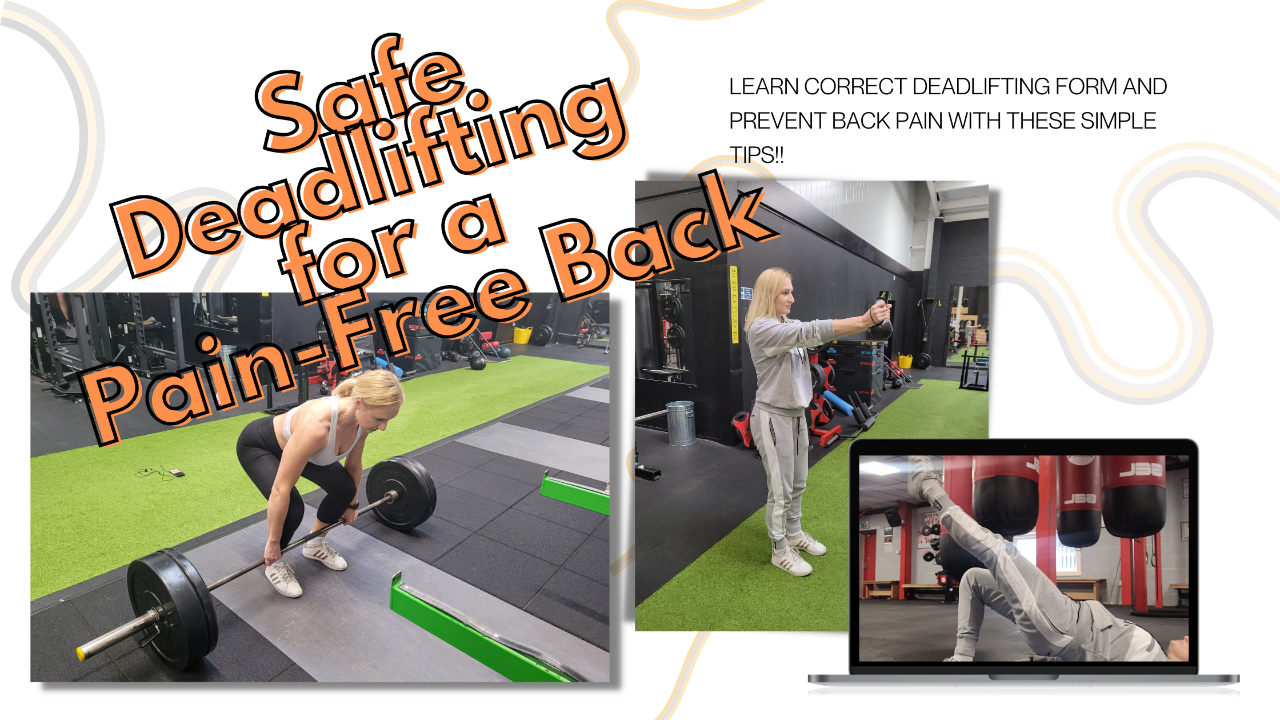
Starting Position
 The starting position is critical in a conventional deadlift because it sets the foundation for the entire lift and can significantly impact the performance and safety of the exercise.
The picture above highlights a few key points you must consider while setting yourself up for deadlifting:
- Start with your feet around hip-width apart.
- Position the Barbell over the middle of your feet.
- Keep the Barbell in contact with the shin.
- Turn the knees slightly out to activate the hip muscles.
- Set your hips slightly lower than the shoulders.
- The posterior part of the shoulder should be in line with the Barbell.
- Imagine bending the bar (breaking it into half) to activate the lats and set the shoulders into a safe and strong position.
- Maintain a braced core and neutral spine and head position.
- Engage your glutes, hamstrings, quads, back muscles, and core effectively.
- Take a deep breath into the belly (diaphragmatic breathing) before initiating the lift to create intra-abdominal pressure and increase the stability of your spine. (For more about proper breathing technique while deadlifting, read about the Valsalva maneuver)
Pro Tips: If you’re finding it challenging to engage your lats and pull back your shoulders during a deadlift or maintain that position, here is an effective tip: Tie a long and lightweight band to the bar, which will attempt to pull the Barbell away from you. This will force you to use your lats to pull the bar closer to your shins, imagining that you’re breaking the bar in half. By doing this, your lats should fire up straight ahead and help you maintain the proper Form throughout the lift.
Concentric (Lifting) Phase
This phase involves contracting the body’s muscles, including the glutes, hamstrings, quadriceps, and back, to lift the weight upward!
Getting the weight off the ground is the main aim, right?
Let’s see the key points:
- Keep the bar close to your body, and ensure it stays in contact with your shins and thighs as you lift it.
- Focus on driving through your heels as you raise the bar, which will help you engage your glutes, hamstrings, and quadriceps, allowing you to generate more power and lift more weight.
- Imagine your pressing away from the ground rather than lifting the weight.
- Maintain a neutral spine position throughout the lift.
- Squeeze your glutes and “lockout” your hips once you reach the top of the lift. This will help you complete the lift and maintain proper Form.
Eccentric(Lowering) Phase
THE ECCENTRIC PHASE is when you bring the weight back to the ground. This phase is crucial because it can help increase overall strength and power by increasing the amount of tension the muscles must generate and reducing the risk of injuries.
How to:
- Keep your core tight and maintain proper Form to maintain stability and avoid rounding your back.
- Keep your muscles engaged throughout the eccentric phase to increase tension and improve overall strength.
- Exhale as you lower the weight and inhale as you prepare for the next repetition.
Reasons your back can hurt while deadlifting!
Lower back pain is common for individuals with sedentary jobs, sitting for prolonged periods, lifting heavy objects improperly, and repeating the same motions frequently. The most common diagnoses for lower back pain in this population are herniated discs, sciatica, lumbar strain, and degenerative disc disease.
Being diagnosed with lower back pain does not necessarily reveal the root cause of the issue. It’s important to note that the underlying problem leading to these diagnoses is often due to poor posture, repetitive motions, obesity, and, in some cases, age and genetics. In essence, these diagnoses are often due to a movement deficit.
So, what is more, likely to be the issue?
- Poor Form (lifting) and posture can cause your spine to be sensitive to flexion (rounding) or extension (arching the back) by placing excessive stress and strain on the spinal structures, such as the discs, ligaments, and muscles. When the spine is not correctly aligned and supported during lifting and other activities, it can lead to abnormal loading and pressure on these structures, which can cause microtrauma and inflammation.
- You are lack of sufficient core stability: The core muscle supports the spine and maintains proper alignment during movement. If your core muscles are weak, it can lead to poor posture and increased stress on the spinal structures, which can cause pain and discomfort. Bracing and maintaining a stiff, neutral spine, good posture, safe lifting form, and completing core stability exercises can help you. This will also make your deadlifts safer and easier for you.
- Your glutes/Side hips DO NOT fire (Glute maximus and Medius):The gluteus maximus and lateral hip muscles (gluteus medius and minimus) are essential in stabilizing and supporting the hips and lower back during movement. If these muscles don’t fire properly, it can lead to compensations and imbalances in the body that can cause a range of issues, including lower back pain.
When the glutes and lateral hip muscles are weak or underactive, other muscles may have to work harder to compensate for the lack of support. This can lead to overuse and strain in these compensating muscles, such as the lower back muscles, hamstrings, and quadriceps. Additionally, when the glutes and lateral hip muscles are not adequately engaged, it can cause the pelvis to tilt forward, which can also contribute to lower back pain.
In the case of a deadlift, glute activation plays a massive role in powering the weight up.
- You might be load intolerant: Your spine might not tolerate load now, so you should avoid heavy lifting until your back heals, including heavy deadlifts. We will test this below as well!
- Strength and muscle (mobility) imbalances: We will test many imbalances below, like external hip rotation and internal rotation. Let’s use the IR as an example:
Limited hip internal rotation can affect a deadlift in several ways. The hip joint is responsible for providing stability and mobility during the deadlift. The joint’s improper internal rotation can lead to compensations and poor movement patterns. One of the most common compensations seen with limited hip internal rotation is excessive lumbar flexion, or rounding of the lower back, during the lifting phase of the deadlift. This compensation occurs because the lifter cannot achieve proper hip extension due to restricted internal rotation. They compensate by flexing the lower back for the lack of hip extension. This compensation can increase stress on the lower back, potentially leading to injury over time.
Allow me to guide you through some tests and assessments that can help you identify what factors may be causing sensitivity in your back and suggest ways to address them.
TESTING YOUR PAIN
1.Flexion/Extension intolerance
 Testing Flexion:
To test for flexion intolerance, grip under a chair with both hands and pull up to create resistance. Then, round your back (flexion) and check for any pain during this movement.
If there is pain, it is a positive test for flexion intolerance. You can read the linked blog to learn about exercises for this condition.
Testing Extension:
Do the same thing, but instead of rounding, ,arch your back (extension) this time. If pain occurs is a positive test. You can read THIS blog for solutions and exercises for an extension intolerant back!
Testing in Neutral position:
Grip under the chair again and brace your core while keeping your back straight, in a neutral position.
If this still hurts your back, take time off lifting heavy weights and complete recovery exercises.
2. Load intolerance

Lift a 2-4kg weight front of your chest with your arms extended. Has this hurt your back? If yes, we going to try the same, but this time brace your core to create stability. Did this get rid of the pain or it still hurt?
If It got rid of the pain, you are lack of sufficient core stability! Exercises like McGill Big 3 – side plank, reverse curl, bird dog, and any exercise like dead bug is a great option for you to gain core stability. You can also carry on lifting with lighter weights, while focusing on proper breathing and bracing!
If bracing did NOT get rid of your pain, you can still complete corrective exercises, but avoid lifting any heavy load until your spine heals!
3. Hip internal/external rotation test
 To test your hip’s internal rotation, lie in a prone or seated position with your knees together. Allow your feet to drop out or push them out as far as your rotation allows. It’s best to have someone assist you and take a picture to check for any side-to-side differences.
If you had less rotation on one side and less than 45 degrees, it’s a positive reading for limited hip internal rotation
Clear internal rotation limitation with exercises like:
- Single leg deadlift airplane
- Banded Internal Rotation Mobilization
4. Fiber test

The word stands for:
F-Flexion
AB-Abduction
ER-External Rotation
If your external hip rotation is limited, it can lead to compensations and poor movement patterns during exercises like squats and lunges. It can also limit your hip strength and change your movements during landing and cutting tasks.
for more info about Faber test and what it can be associated with CLICK here.
To test, lie on your back with your legs straight and place one foot just above the other side of the knee, as seen in the picture. Allow your knee/leg to fall outwards/to the side as far as possible without rotating on the hips to gain more range.
Measure the angle between your thigh and the ground. If there is a side-to-side difference, the test is positive!
Exercises to improve hip external rotation include:
- Kettlebell weight shift
- Band Distracted Pigeon Stretch
- Foam Roller Piriformis Release
- Lateral Band Walks
- Banded external rotation mobilization
5. Side lying Hip Abduction

To test the strength imbalance of your gluteus medius(side hip muscle) and assess pelvic stability, have someone provide resistance while performing leg abduction(side kicking).
Look for any differences in strength between sides and pain or weakness. You should be able to resist for at least 3-5 seconds. If you were unable to, the test is positive.
Complete exercises like:
- Side kicks
- Side Plank Clamshells
- The lateral mini-band walk
- Fire Hydrants
To check your glute max muscle activation, concentrate on feeling the exercise in your glutes rather than your lower back or hamstrings when performing a single-leg or double-leg bridge. If you feel one side is not firing or other muscles are firing, like the hamstring or lower back before the glutes, the test is positive1
Include exercises in your routine:
- Touch down squat (pistol squat) or single leg get up and sit down
- Single leg DL
- Skater Jumps
- Bulgarian split squats
- Single and double leg bridge with 10 sec top hold